
Using Liquid Watercolor Tubes (and How to Make Them Last)
Using watercolor paint tubes can feel like an overwhelming concept for new watercolorists. How do I choose from all of the colors? Why are they so expensive? How much paint should I use? How do I store them? If you’d like to give them a try, read on to learn why I now prefer using watercolor paint tubes instead of pre-set paint trays.
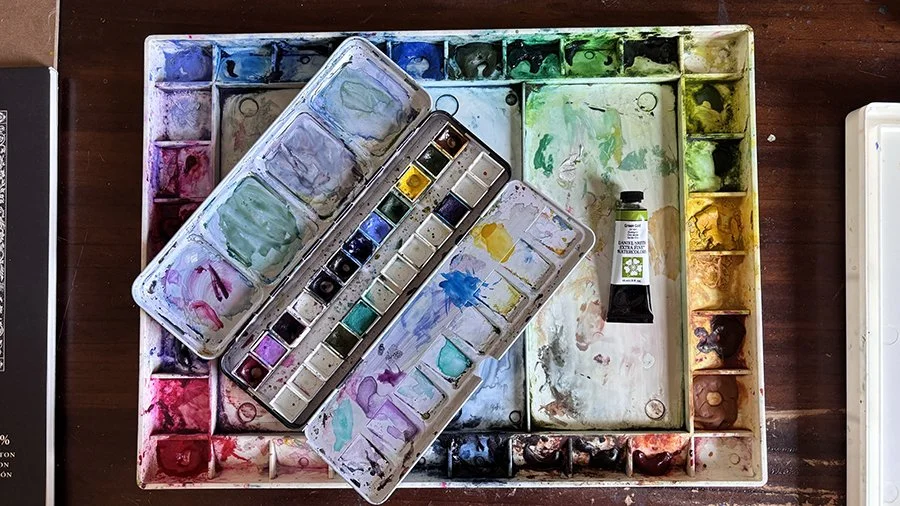
In the above photo, you will see two paint palettes.The larger one is filled with colors of my choice, all from liquid paint tubes. The smaller one is a pre-set tray from Daniel Smith. Both include high quality paints, and as you can see, I do use both of them. However, the one that I filled with liquid paint tubes is now my go-to for every-day painting. Even though I have lots of colors in my palette, I don’t recommend starting with this many. The best way to begin is with a limited selection of colors in the primary family (red, blue, yellow). You can mix many of your own colors from just those 3.
Try before you buy (a lot):

Color dot card
A fun way to start your selection process is to purchase a color dot card. I didn’t link one here because a quick online search will show you many results to choose from. This allows you to try a bunch of colors at a low cost per each color. If you’d rather dive right in, these are 3 colors that are always a good time: Quinacridone Rose, Hansa Yellow, and Ultramarine. The brands I use are Daniel Smith and Winsor & Newton. There are many other brands that are wonderful too — just be sure to buy artist-grade or “professional” quality paints and not the brands for school-age children.
Cost:
The cost of paint tubes can seem high when compared to pre-set paint trays. However, if you start with a limited palette (3-5 colors), you will see a savings from less wasted paint. Some of the paint pans in my pre-set trays never get used. Another savings benefit is that I can control how much paint I need at one time.
Storage:
Liquid paint from tubes can last a long time. I recommend squeezing most of the tube into an empty palette well (as seen in my photos). That way it won’t dry out over time and therefore stuck in the tube. If that does happen, just cut the tube and scoop the paint into a palette well. Once you’ve squeeze the desired amount into your palette well, let that paint dry overnight or for 24 hours. If you still have paint left in your tube, seal the tube tightly with the cap. You could also squeeze the remaining paint into a smaller, travel palette. It is important to use a palette with a lid. This will prevent dust and dirt from getting on the paints.

Filling my palette with a liquid paint tube.

Newly filled tube pictured alongside dried and previously filled wells.
Use:
Once your paints have dried in your palette, just spritz a little water on them when you’re ready to paint. You can also simply dab the paint with a wet brush. This will “activate” the colors.
In my next post, I will share a video tutorial on how I use these supplies to create a simple, summertime painting.
~K